Create and manage
Learn how to create and manage Bundles through the app's user interface in the Shopify Admin.
Open the Create Page
To create a Bundle, open the Dashboard and click on View Bundles. If you have not yet created a Bundle, a placeholder is displayed here. Click on Add Bundle to create your first Bundle.

Create your Bundle
To explain, let's create a smartphone-based Bundle now. Three sections are available for creating and editing a Bundle:

1. General
Within this section you can make general settings for the Bundle.

1. Bundle name
Here you can enter the name of your Bundle. This name will be displayed to your customers within the storefront.
2. Bundle status
You can set the Bundle to either Active or Paused status. Only active Bundles are displayed in the storefront. If you want to create the Bundle but present it to your customers at a later time, set the status to paused.
2. Products
Within this section you can add up to 5 products to a Bundle.
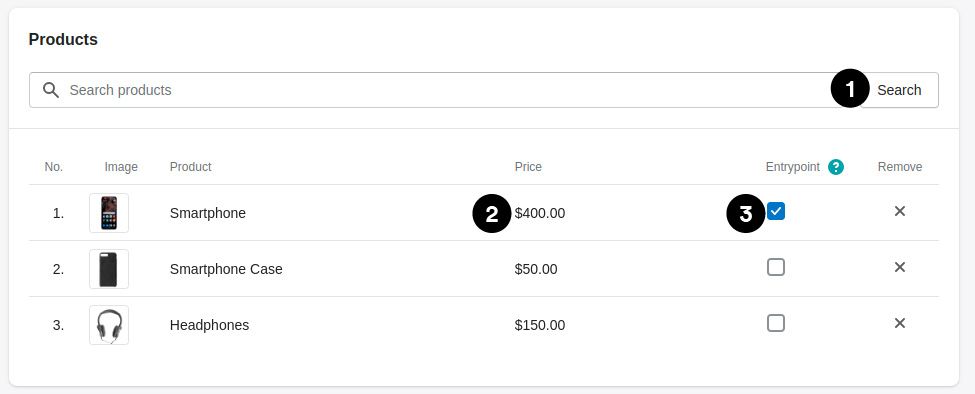
1. Add products
Clicking on Search or entering data in the search field opens a pop-up from which you can select products and add them to the Bundle. Afterwards they will be displayed in the list.
2. Product price
The corresponding product price is displayed here. If a price range is shown here, it means that it is a product with variants that have different prices. The maximum and minimum price is then displayed.
3. Entrypoint
This product serves as an entry point within the storefront. If this product is opened or is in the shopping cart, the Bundle will be displayed in the corresponding widget on the product or shopping cart page (how to place the two widgets within the storefront is shown in the next chapter). This way you can control for which products the whole Bundle should be displayed or not. Each product can be marked as an entry point.
3. Discount
Here you can discount the Bundle to increase the actual purchase incentive for your customer.
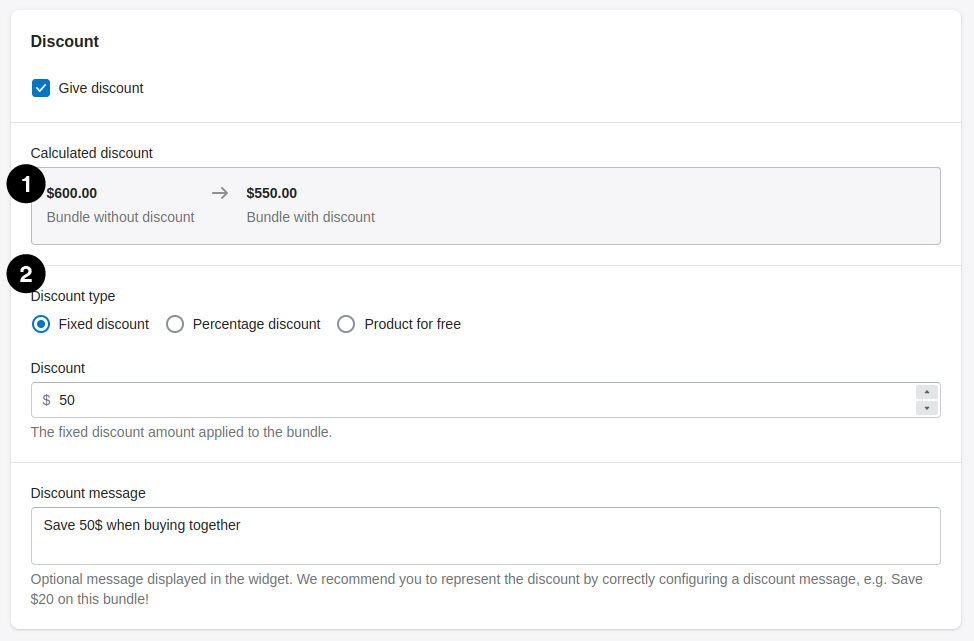
1. Calculated discount
Here you will dynamically see what the Bundle costs without and with discount, depending on what discount you have applied. If a price range is displayed this means you have variant products with different prices within your Bundle. Then the minimum and maximum price is shown in each case.
2. Discount type
Here you can apply the discount to the Bundle. There are three types available:
Fixed discount:
Discount the Bundle with a fixed amount of money.
Percentage discount:
Discount the Bundle with a percentage value. This type is best for Bundles that contain variant products with different prices. Due to the price fluctuation, a constant discount is guaranteed.
Product for free:
Here you can offer your customers a product of the Bundle for free. Ideally, this should always be the cheapest product.
Each of these three discount types can be provided separately with a message to make customers aware of the discount in the storefront.
When you are satisfied with your Bundle you can save it. Congratulations, you have now successfully created your first Bundle.
Listing Page
After you have successfully created your Bundle you can now see it on the listing page. Here you can see the name of the Bundle, all included products and the status.
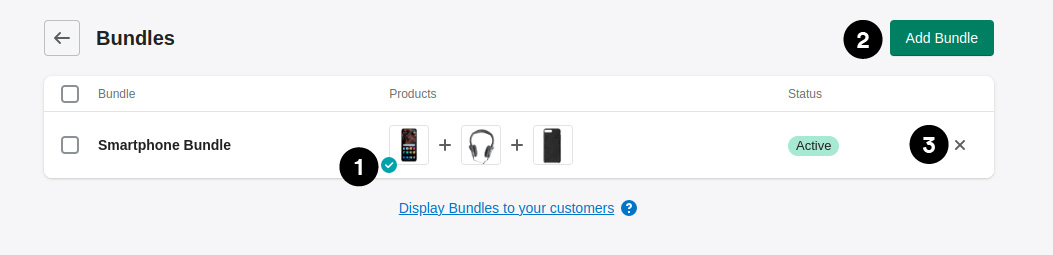
1. Entrypoint
The corresponding Entrypoint product is marked by an icon.
2. Add Bundle
Here you can add more Bundles.
3. Remove Bundle
If you don't like the Bundle anymore you can delete it here.
Now that you have created a Bundle, in the next chapter we will show you how to place it inside your storefront through provided widgets using the Shopify Theme Editor. Then you can present it to your customers and start earning money with it.